This 'Top 10' list comes from Gretchen Siegchrist's Guide at, About.com. By following some simple rules for video editing, you can make your movies flow together smoothly, in a classic style, without resorting to multiple transitions. Of course, rules were made to be broken and creative editors take extreme artistic license. But, if you are new to the craft of video editing, learn these rules and consider them a foundation from which to develop your skills.
1. B-Roll
B-roll refers to video footage that sets the scene, reveals details, or generally enhances the story. For example, at a school play, besides shooting the play, you could get b-roll of the outside of the school, the program, faces of audience members, cast members hiding in the wings, or costume details.
These clips can be used to cover any cuts, or smooth transitions from one scene to another.
2. Don't Jump
A jump cut occurs when you have two consecutive shots with the exact same camera set up, but a difference in the subject. It happens most often when editing interviews, and you want to cut out some words or phrases that the subject says.
If you leave the remaining shots side-by-side, the audience will be jarred by the slight repositioning of the subject. Instead, cover the cut with some b-roll, or use a fade.
3. Stay on your Plane (Don’t Cross the Line)
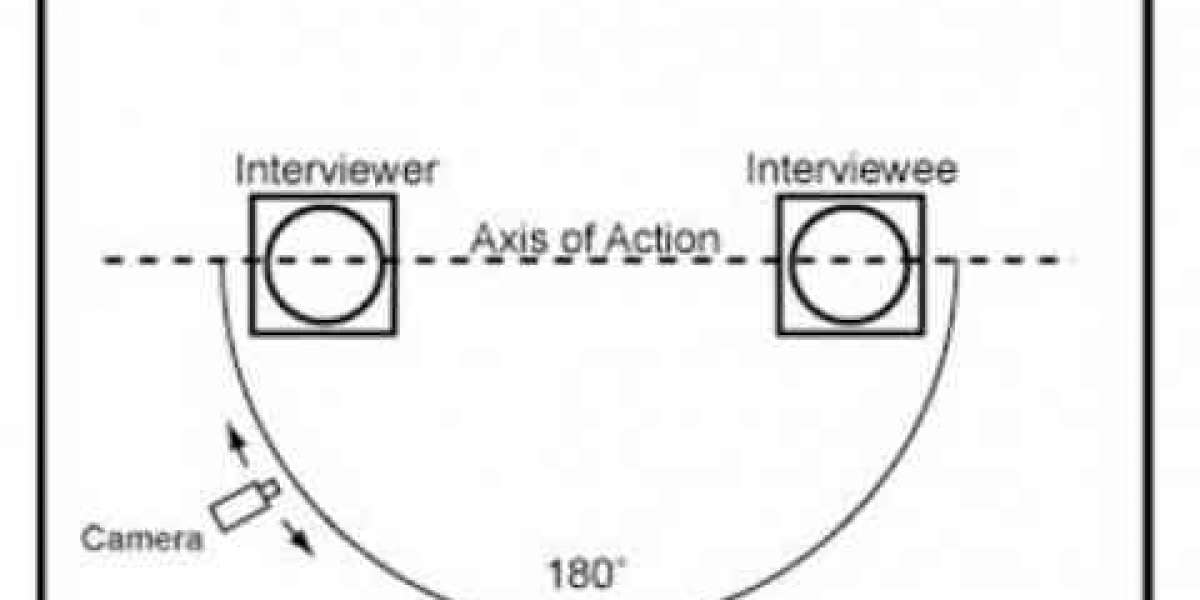
When shooting, imagine that there is a horizontal line between you and your subjects. Now, stay on your side of the line. By observing a 180-degree plane, you keep a perspective that is more natural for the audience.

It is important to maintain interest in an interview by having a variety of shots that show different perspectives or angles. However, it is essential to maintain “consistency of screen direction.” This means that you should not cross the “Axis of Action” or the imaginary line that follows the main subject’s action or direction of focus.
The 180 Degree Rule states that you can place the camera anywhere along the 180 Degrees of one side of the axis of action and maintain consistency of screen direction.
You should not cross the axis of action without:
1) The use of a moving shot that shows the crossing of the axis of action.
2) Indicate on screen that a shot is a “Reverse Angle” as is done in sporting events.
If you’re editing footage that disobeys this rule, try using b-roll between cuts. This way, the change in perspective won’t be as abrupt, if it’s noticeable at all.
4. 45 Degrees
When editing together a scene shot from multiple camera angles, always try to use shots that are looking at the subject from at least a difference of 45 degrees. Otherwise, the shots are too similar and appear almost like a jump cut to the audience.
5. Cut on Motion
Motion distracts the eye from noticing editing cuts. So, when cutting from one image to another, always try to do it when the subject is in motion. For example, cutting from a turning head to an opening door, is much smoother than cutting from a still head to a door about to be opened.
6. Change Focal Lengths
When you have two shots of the same subject, it’s easy to cut between close and wide angles. So, when shooting an interview, or a lengthy event such as a wedding, it’s a good idea to occasionally change focal lengths. A wide shot and a medium close up can be cut together, allowing you to edit parts out and change the order of shots without obvious jump cuts.
7. Cut on Similar Elements
There’s a cut in Apocalypse Now from a rotating ceiling fan to a helicopter. The scenes change dramatically, but the visually similar elements make for a smooth, creative cut. You can do the same thing in your videos. Cut from a flower on a wedding cake to the groom’s boutonnière, or tilt up to the blue sky from one scene and then down from the sky to a different scene.
8. Wipe
At weddings, I love it when people walk in front of the camera. They are apologetic, but unless it happened during the vows or the first dance, I am grateful for the wipe they gave me to use during editing. When the frame fills up with one element (such as the back of a black suit jacket), it makes it easy to cut to a completely different scene without jarring the audience. You can set wipes up yourself during shooting, or just take advantage when they happen naturally.
9. Match the Scene
The beauty of editing is that you can take footage shots out of order or at separate times, and cut them together so that they appear as one continuous scene. To do this effectively, though, the elements in the shots should match up. For example, a subject who exits frame right should enter the next shot frame left. Otherwise, it appears they turned around and are walking in the other direction. Or, if the subject is holding something in one shot, don't cut directly to a shot of them empty-handed.
If you don't have the right shots to make matched edits, insert some b-roll in between.
10. Motivate Yourself
Ultimately, every cut should be motivated. There should be a reason that you want to switch from one shot or camera angle to another. Sometimes that motivation is a simple as, “the camera shook,” or “someone walked in front of the camera.”
Ideally, though, your motivations for cutting should be to advance the narrative storytelling of your video.


